Kinemaster for PC is a comprehensive video editing tool that contains many unique features. You can create and edit videos in a variety of your favorite formats; it enables you to put media to share multiple social media handles. the vast majority of people choose to use it on their personal computers or laptops.
There will be no additional costs to use Kinemaster on Windows PC or macOS. In this guide, you will learn complete installation and how you can use import and export videos from your PC.

Is Kinemaster officially released for PC?
Kinemaster for PC is a very handy video editing app designed for mobile users; it currently only supports Android and iPhone devices. There is no word about when it will be released for desktop users; however, Kinemaster is extremely popular on mobile phones, so developers might release it in the future.
There are a number of techniques that help you to run Kinemaster on PC. We will discuss all possible methods, whichever is suitable for you, select and install it.
How to Install Kinemaster on Windows
To install Kinemaster on a desktop, you need to run an Android emulator that must be capable of handling video editing tasks. There are various emulators available like LD Player or BlueStacks. Follow the below guide to install.
Step 1: Download a stable emulator
You have two best options to use Kinemaster on desktop, BlueStacks is a powerful emulator which requires high-end PCs to run, in case you have a low-end system then download LD Player. We will use BlueStacks, download it from the below link.
Step 2: BlueStacks Installation
BlueStacks comes with a packed format that needs to be unpacked, you need to install the package to access control, open the emulator installer file then select Installation location, and accept terms and conditions.

Step 3: Start Emulator
Once you install an emulator on your PC, it automatically creates a shortcut icon on the desktop so you can launch it anytime. If the impression window is not appearing then open it manually.

Step 4: Enter Gmail ID
BlueStacks brings a powerful application store which is Google PlayStore, as you know it requires a Gmail ID to download any kind of app. Enter your ID details or you don’t have an account then create a new one.

Step 5: Download Kinemaster for PC Video Editor
Now finally you have the option to download and install Kinemaster on a Windows computer using BlueStacks, search “Kinemaster” in the PlayStore then select the first result, and click the “Install” button. That’s it.

It will start installing the editor into the emulator.
Step 6: Launch Kinemaster on Desktop
When you complete the installation, you get an “Open” button click on that, and run the editor. It takes a few seconds to set up.

Kinemaster has successfully installed it into your system now you can use it whenever you need it. You must be thinking that how you can import and export your videos into Kinemaster well that’s really easy you can learn it from the below steps.
Download KineMaster 6.0.6.26410.GP for PC
100 Best Kinemaster Alternative
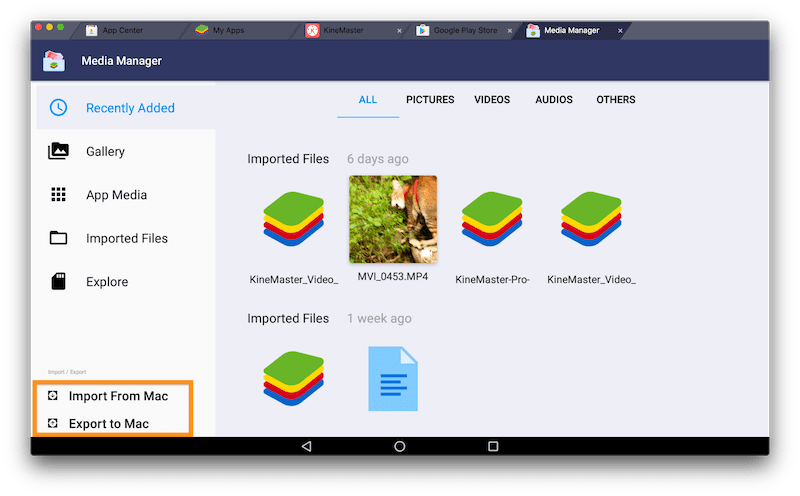
How to import and export Videos?
If you are running kinemaster using BlueStacks Android Emulator and then you definitely know that there is no direct option to import and export video, here is how you can.
- Open BlueStacks
- Run “Media Manager“
- At the bottom, you can see “Import from PC” and click on that.
- Now select the video or media that you want to add for editing.
- In the same way, you can also Export Videos that you have edited using Kinemaster.
Using this method you can add as many videos as you want there is no restriction but you need to keep in mind one thing that is BlueStacks storage. It allows you 64GB storage by default if you exceed it, you will be notified.
List of best KineMaster useful features
Here are the all features which Kinemaster provides you royalty-free music, overlays, stickers, and more from the KineMaster Asset Store.
- Popular aspect ratio
- User-friendly interface
- Precise frame-by-frame trimming
- Chroma Key green screen
- Support Android and iOS platform
- Assets Store for unlimited effects
- Instant preview for all edits
- Hue, brightness, and saturation controls
- Audio filters, including voice changer
- Blur, mosaic, and other effects
- 4K 30FPS Rendering
- Lots of animation styles
- Speed control for video clips
- Volume envelope (Precise volume control from moment to moment within a clip)
- Transition effects (3D transitions, wipes, fades, and more)
- A variety of themes, animations, and visual and audio effects
- Share on YouTube, Facebook, Google+, Dropbox, and more
- Free trial version
It enables you to multilayer so that you can run the long project, it also provides your basic features like timing, cutting, images, text, and volume control. You can also explore color LUT filters and 3D transitions.

There are many users who want to film 4K videos on their mobile phones, but there is no reliable choice for editing footage other than Kinemaster. Yes, it allows you to edit video in 4K 30FPS resolution without losing quality. For better performance, you can customize Bitrate from low to high.
About BlueStacks
BlueStacks is the fastest Android Emulator on the planet which offers you really good performance while playing games using Android apps. Its aim is to provide you with an Android environment on the desktop. The emulator is completely free to download.
The emulator is especially coming for mobile gaming on a personal computer but lets you experience the application, it provides you the option to install unlimited titles on it without having a technical issue. The company is connected with over 100 of the biggest smartphone game publishers. The emulator can be really helpful if you want to play Android stuff on a PC.
System Requirements
- Operating System: Windows 7, 8, and 10 and macOS.
- Ram: Minimum 4GB of Ram.
- Processor: i3 or later and AMD.
- Internet: Relible Internet connection.
- Storage: 3GB free space.
- Directx: Latest or 11.
A quick guide to Install Kinemaster PC
- Download Bluestacks from the below link
- Install BlueStacks on PC
- Open BlueStacks on your PC
- Go to the Play Store and create a Gmail account
- After that search KineMaster and Download that
- After all, you will be able to run KineMaster On Windows PC.
What permission is required it?
Using Kinemaster on a mobile phone, you need to give some permission, it requires your microphone, and camera, when you record videos or sound directly from the editor, it uses your device microphone. When you complete your project it saves data on your file manager.
What is Kinemaster Subscription?
Kinemaster brings premium plans for those who want to invest in their video editing tools. It offers you two types of plans: the first one is based on months and the second one is based on year. It also allows a free trial version which includes watermark and ads, some limited effects.
You can remove the watermark by purchasing a premium plan, it provides you vast features unlimited high-quality effects, and audio, sound effects.
Once you subscribe to the pro plan it automatically renews every month or year, but you can also cancel it anytime with no questions.
We suggest you go for yearly subscriptions because it offers you a huge discount for the long-term but if you want a test editor then grab the monthly deal.
It provides you with two payment methods, you can use a credit or debit card to pay the amount, and also use Google to redeem the gift card. The application can be downloaded from PlayStore and Apple Store. Read the full review about us.
If premium suits your budget then go for it.
KineMaster VS PowerDirector Detailed comparison
Are you confused between Kinemaster and PowerDirector? All video editors are powerful and stable, making it challenging to pick between them. For your convenience, we have compared every single feature.
It is often said that among all the mediums of conveying any message, the medium that holds the most impact and force is the medium of video.
But not all videos are the same or bring in the desired level of results as initially intended by the maker.
A primary factor on which the success of any video content is very much dependent is the time during which it is being created and edited before publishing.
Kinemaster VS PowerDirector
| Features | Kinemaster | PowerDirector |
|---|---|---|
| Stock Library | ✅ | ✅ |
| 4K Supports | ✅ | ✅ |
| Chroma Key | ✅ | ✅ |
| Add voiceovers | ✅ | ✅ |
| Reverse videos | ✅ | ❌ |
| Video stabilizer | ❌ | ✅ |
| Voice changer | ✅ | ✅ |
| Blending-modes | ✅ | ✅ |
| Effects | ✅ | ✅ |
| Masks | ✅ | ✅ |
| Keyframe animation | ✅ | ✅ |
| Direct Share | ✅ | ✅ |
| Sound effects | ✅ | ✅ |
| Speed adjustment | ✅ | ✅ |
| PREMIUM | ✅ | ✅ |
In this article, we discuss two such powerful and quite famously used video editing tools namely – KineMaster and PowerDirector.
Kinemaster
KineMaster is a super powerful and professional quality video editing app, made by a South Korean multimedia software developing company.

KineMaster is most popularly used by smartphone users and for the most part, it is completely free to use. Still, a few premium features do require in-app purchases to unlock them.
Aside from this, it is also available for tablet and Chromebook users and can be downloaded from the Apple Store and Google Play.
Features of KineMaster
The KineMaster video editing app is packed with a number of features that make it undoubtedly one of the best professionally equipped video editing software. These are –
Blending Modes
Users can be awesomely creative with their videos by using the eight different blending options.
Reverse
Use transitioning effects or turn the video time in the reverse mode easily.
Chroma Key
Composite two or more videos using the chroma key feature.
High Resolution
Edit and export 4K quality videos and unleash your full potential.
Video Layers
Supports playing back of up to 9 videos.
Pros and Cons of using KineMaster
Pros
- Great app for editing and including text and effects in videos.
- Super easy to use both for beginners and pros.
- Literally no limit on the length of the video you make and edit.
- Excellent in merging different videos and content together.
- Both the interface for Android and iOS users is almost the same, making it easy to switch between smartphones if needed.
Cons
- The free version leaves a watermark in the video. This is okay in the case of personal and non-commercial videos but for client-based work, its premium version might be required.
- Due to the advanced features that KineMaster is packed with, its performance on various devices may vary and some features such as Chroma Key may not work at all.
PowerDirector
PowerDirector is another super powerful, professionally inspired, and made to embark endless possibilities kind of video editing software.

The software has been developed by CyberLink and is available for users of Windows OS, iOS and Android-based smartphones users as well.
Although the PowerDirector software is free to download, it does offer subscription-based packages with additional premium features.
Features of PowerDirector
PowerDirector video editing software offers the following professional-level features that make it stand out from the other video editing software.
Dynamic Keyframe Controls
Apply dynamic motion to effects with enhanced keyframe controls.
Design Masks
Make near-natural image composites to cut and mix images from several different videos and that too with utmost precision.
Add Customizable Graphic Titles
Add a bit of creativity with easy-to-customize text and titles at the beginning of every scene or clip.
Other Distinguishing Features
- Create an overlay video with animated sketches.
- Add vector objects in-between video frames such as conversation bubbles in silent videos.
- Keep a total track of every object in motion in every video you make.
- Discover your full potential and creative sense with green screen editing.
- Begin and end your videos with dynamically appearing and disappearing titles.
Pros and Cons of using PowerDirector
Pros
- Quick and easy-to-use video editing software.
- Packed with almost all the options required to render a professional-quality video.
- Supports several different file types.
Cons
- The free version has adverts showing up which interferes with continuous and smooth workflow.
- Some professional-level features are hard to learn and implement, thus occasionally making it hard for beginners.
Here we have compared Kinemaster and PowerDirector, whichever suits your needs you can download from Google PlayStore or iPhone Store to test editing features.