In this post, we’re talking about how you can track any object in Final Cut Pro, and this automated process makes it easy to add graphics and text anywhere within your videos. So when Final Cut Pro was first released, people were always talking about how it’s not a professional editing software, but it has come so far from where it originally started to where it is now.
With Final Cut, you have the ability to add in plugins. And Pixel Film Studios is one of the companies that is making these plugins for Final Cut to basically simplify the process and give you tools that will enhance your editing.
And this is one of the really cool things about Final Cut in general is that it speeds up your editing workflow.
So when you add in these plugins, you get a whole new set of controls and you get very specific things like Auto Tracking. So this is one tool that I use all the time, and specifically because I want to be able to add graphics and text within my videos.
Tracking was not necessarily something that was easy before this plugin came out. The old way of tracking was basically going keyframe by key frame and moving the text or the object in your video and basically doing it manually. It takes a ton of time to keyframe things frame by frame.
So with the Auto Tracker, it’s an automated process. Quickly load it into your timeline, and it tracks objects within the frame so that you don’t have to do it manually. It really renders fast and makes the whole editing workflow easy.
Also Read: Create a Free Photo Slideshow Video with Music
How to use Auto Tracker in Final Cut Pro?
let’s dive into the software and let me show you how powerful this is. So once you have the plugin installed in Final Cut Pro.

- You go into your Generator tab and you can use a Drop Zone,
- Text, or Drop Zone & Text.
- you just drag this right on top of your footage.
- Now what you are going to do is go to the front of your clip, pull up the Track Editor which is going to be in your Effects window, and then a new window is gonna pop up, and this is your tracking.
- So you could use a square or a circle to track.
- Readjust the frame, find a point that you want to track
- Use the square or the circle and create your box around that object.
- Click the Play button and what it’s doing is tracking that specific point, that part in the frame that you have selected.
- It’s creating all the keyframes for you.
This is super powerful, you just have to sit and let it render, and it goes frame by frame. And as you could see, it moves very fast. Now one thing I want to note is that you have this Track Quality so you can bump this up to 100%. It will take a little bit more time to render, but your results will be a little bit better, especially if you want that tracking to be perfect.
So once it finishes tracking your object, you just hit Export Data. Now in your Effects window, you could see that it has a bunch of different tools that you can use. You want to make sure that you turn your Drop Zone and your Text on and off. You can basically put anything in that Drop Zone editor. So whether you have another motion plugin or you just have some element that you’ve created with a transparent background, you can use any of that as your tracking.
Basically this software gives you all the tracking data points, and then you add anything you want in that drop zone.
Pull an arrow into the timeline
- Go to the tracker, go down to the drop zone
- Select the drop zone, click the clip and apply it.
- Scale it within the drop zone so you see everything, and then rotate it so that it points exactly at what I want to point at.
- Now you can grab on the screen itself and move this object around which is great, so you can find where you want to place it, change the rotation.
- You can change your anchor point, your position.
- Basically all the tools that you would want to readjust your graphics are built in here.
- Now when you play it back, you can see that it’s automatically tracking that object.
Now one of the really powerful things about this tracking software is that it not only tracks your position, but it also tracks your rotational data. And it also tracks the size. So beyond just tracking your position on the screen, you can track whether something rotates and follows it, and whether something gets smaller or bigger. Super powerful depending on what you’re creating, you might want to add those on.
Final Cut Pro Other Plugins
Pro Text Slide
Now if you just want to have your graphic or your text just move around the screen following the object that you’re tracking, then you would just turn it off here. Turn off the scale and turn off the rotational data. Now you’re just tracking the position and the graphic just moves with the object.

We are going to show you how you can add motion graphics using this Auto Tracker. So I have another plugin from Pixel Film Studios called Pro Text Slide & Flip, and this creates cool graphics elements, and you don’t really have to keyframe anything, it’s the same type of thing. It’s all automated. So you have these moving text elements and everything is super easy to use.
- Go to that Drop Zone editor and apply that Compound Clip as my graphic element.
- You have that motion graphic happening as well as the tracking.
- So you just created some motion with the tracking elements.
Motion Blur elements
One other tool that this plugin has is a Motion Blur element. If you go into your Inspector and you go down to your Drop Zone controls, you can see right at the bottom you have this Motion Blur, and it’s a slider.
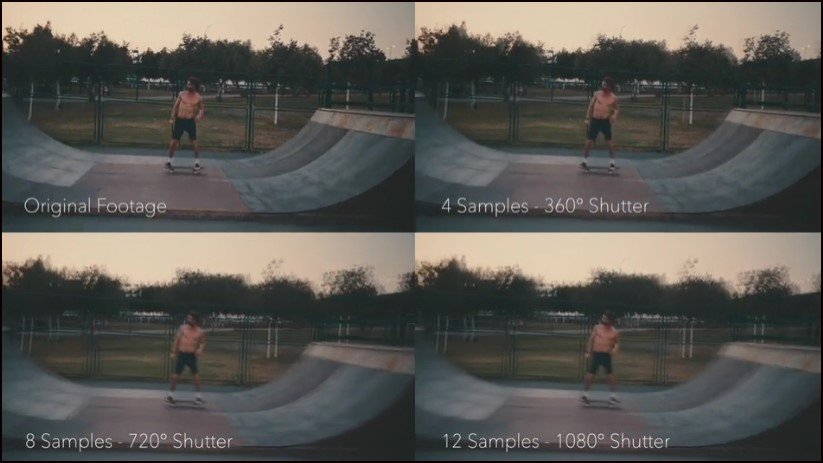
It goes from zero to three. And what that does is basically changes the amount of motion blur on the object. So if you’re shooting with motion blur in the frame, you want to match that with your graphic elements so that it seems seamless. Now what’s also cool is you can use this tracker to track a background object and put something on a wall.
Just one thing you have to keep in mind is that this tracker does not do perspective, so the wall needs to stay flat to the camera. You can’t be shifting the perspective, otherwise the track will not work properly. So I have a couple of tips for you to really make this plugin work when you’re creating your content.
Pro Tips
Shoot at a high shutter speed.
If there’s too much motion blur, then the tracker’s not going to grab onto it. The bare minimum is doubled out of your frame rate. So typically that’s what you’re going to be shooting at. If you’re shooting 30 frames a second, you’ll have a 160 shutter. If you’re shooting 24, you’ll have a 48. But you don’t really want to go under that, otherwise the tracker will have a little bit of issues.
It deals with contrast, that’s how it tracks objects. So you have to track an object where there is contrast and the automation can actually see the difference between objects and it will track those differences.
So when you’re shooting, just make sure you have contrast where you want to track an object. Patterns also work very well, so look for patterns that you can use as objects to track.
Enhance contrast level
One is to bump up the contrast of your clip before you apply the tracker. Now you can go through and take this contrast off later, but what that does is basically create those contrast lines, so the tracker really has something to grab onto.
Shoot in Slow motion
The other tip is to shoot in slow motion. So 60 frames a second or 120 frames a second, something slower than normal, especially when it comes to shots that are hard to track. So you shoot in slow motion and track in slow motion.
So for example, if you want your shot to be in 30P, you can still shoot it in 120 frames per second so that you’re able to track the object that you want to track and then speed it up later by four times, and now you get 30 frames per second with that precision tracking.
Also Read:
Those are just a couple of things that will make it easier to track objects so you can really isolate that specific thing that you’re going after.
Kimemaster chal nhi reha