If you’re seeking the best technique to stick text to moving objects, keep reading because we’ve discovered an easy and straightforward motion tracking solution. You only need to install PowerDirector Video Editor on your computer.
Today, I’m going to show you 3 practical ways to use this feature. Motion tracking in video editing is when you track the movements of a person, object or scenery within a scene. Once the movement is tracked, you can apply text, image, icon and essentially any object to follow that same movement.
We often see motion tracking used when applying animation effects, having labels or text follow a person in video games or sports, or censoring sensitive content.
How to Stick Text & Effects to Moving Objects Using PowerDirector
You must have a compatible system to run this software. Let’s try it out in PowerDirector. With your clip in the timeline,
- Go to “Tools” and select “Motion Tracker“.
- In the Motion Tracker window, a tracker has already been added to the timeline.
- Play the video clip and pause when the object we want to track first appears on the screen.
- Select “Mark in” to mark the beginning of the tracker.
- Move the Selection Box in the preview window to the object we want to track.
- Adjust the size.
- Then click the “Track” button PowerDirector will then automatically track the object.
- Select “Mark out” to complete the tracking.
- Next, let’s add some text to the tracked object.
- We can change the font, size, and more.
- We can also adjust the placement of the text by dragging it in the preview window.
- Next, let’s try adding a Picture to the Picture object.
- First, right-click the track to copy the tracker.
- Since it’ll also copy the position of the “Selection Box” and track path, we can directly add our media without re-tracking the path.
- Click the “Import Media” button here and we’ll choose “Import From Video Overlay Room” from the drop-down menu.
- Let’s choose this PiP object from the Bloggers Social Media Pack.
- Then adjust the size and position of the PiP Hit play to preview the result.
- Now we’ve got a text and a PiP object following the same track path.
New Motion Tracker
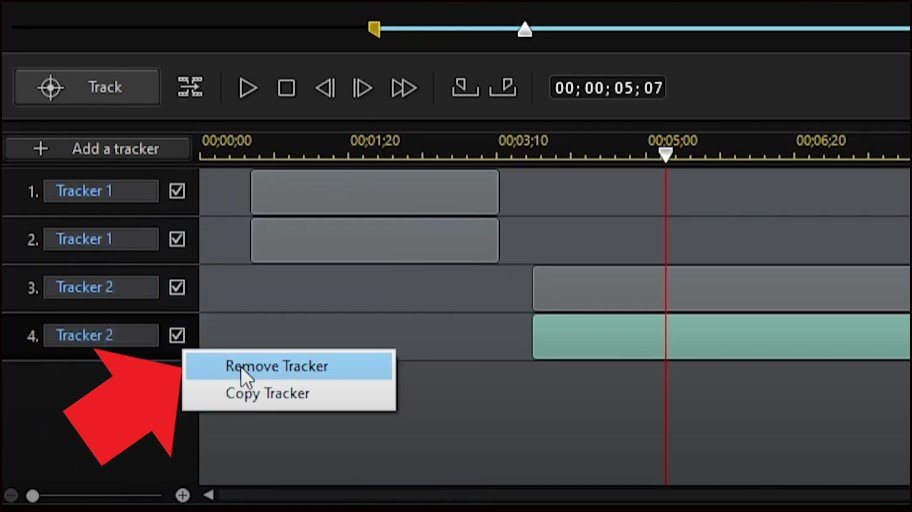
Next, let’s create a new motion path by adding a new tracker by clicking “Add a tracker“.
- Repeat the same steps as before by dragging and adjusting the Selection Box and click “Track“. If we want to be more accurate, we can also fine-tune the track path by tracking manually frame by frame.
- Select “Track One Frame Only” and track the object frame by frame while adjusting the Selection Box.
- We can still continue to auto-track by clicking on the Track button again.
- Then we’ll continue by adding another PiP object to this tracker.
- If we want to delete a tracker, simply right-click the track and click “Remove Tracker” After we’ve finished all motion tracking, click OK to save and close the Motion Tracker window.
All the editing and media will automatically be added back to our editing timeline. We can also organize the timeline to improve our editing efficiency by dragging the same clip type to the same track. Here we’re organizing all these text clips together on the same track.
Add Transitions
Let’s add some transitions to the media we’ve just added. We’ve already got some frequently used transitions saved in the My Favorites folder. Let’s apply these to our clips.
- Drag and place the transition on the clip.
- The default duration of the transition is 2 seconds but we can adjust the duration by double clicking on the transition itself or click the “Modify” button here.
- If we want to edit a motion tracked media object, we can double click the media clip to open the Designer.
- We can see that keyframes are automatically added on the timeline.
- And here we want to stabilize the title a bit so we’ll remove the keyframes here.
- We can still add additional motion trackers if we need to by placing the playhead to where we want and selecting the video clip on the timeline.
Let’s add an effect this time. In the drop-down menu, we can choose to apply Mosaic, Spotlight, Blur, and Gaussian Blur.
There are also two mask types, Box and Circle. We can directly adjust the mask size in the preview window. This censor effect is incredibly useful when you’re shooting a vlog or dealing with sensitive information.
Also Read:
- How to use Motion Tracking [Simple Method]
- How to Create a Split Screen Effect on Mobile
- Create a Free Photo Slideshow Video with Music
Now that you’ve learned 3 ways to use motion tracking, let us know if there are any other cool effects you’d like to learn using this feature. You can download and Install the PowerDirector video editor from the official website, it supports Windows and macOS platform.